A couple of years of experience have taught me there are many ways to install software into Linux. Most of those methods are as easy as fishing for piranhas with a horse for bait – it’s quick and painless (for the fisherman, absolute nightmare for the horse) and a few of them are as enjoyable as listening to your tone deaf sister do karaoke without a background track – it goes on for ever and ever and ever and causes your ears to close shop and move to another body. A couple of days ago I was stuck down with a couple of those convoluted and very painful installation methods….

“AAAAARRRRGHGGGHGGHEEGHGHHGH!” Is the exact sound I made when Apt screwed up during a distribution upgrade and left me with 208 installable-but-not-gonna-be-installed packages, 2 removable-but-ain’t-gonna-do-it packages, 16 upgradeable ones that rolled their eyes at me for two days while I tried to figure out how to get past the gigantic horned gatekeeper that blew flames and shook its double edged battle axe at me every time I tried to log in to KDE (little did he know I’d got gnome installed too so I snook past where he wasn’t looking).
It took two days for me to realize I could fix Apt with just one magic command, which I’ll come to before the end of this article. But first, here is a guide to properly installing and uninstalling software into a Linux system. I use Linux Mint, a flavor of Ubuntu which is based on Debian so the commands and methods I will demonstrate here will be based around Debian.
The guide is split into 5 sections:
- Graphical Package Managers
- Command Line Installers
- Source Code Installation
- Building Source-Code into an External Directory
- When Things Go Wrong
The installation methods demonstrated are:
Yes, this is the simple kiss-of-life guide to breathing fire into your computer’s motherboard with software you previously thought impossible to get installed.
Package Managers
More often than not, when you need to install software into a Linux system or update and upgrade software that already exists within the system all you need do is activate a package manager, locate the program you wish to install, click install then sit back, relax, put your feet up and drink your favorite beverage while Linux does the rest. Let’s take a virtual whirlwind tour of some of those package managers.
Graphical Package Managers
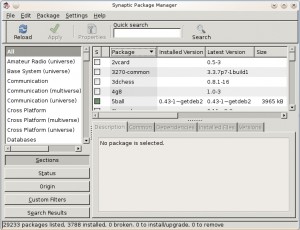
There are too many package managers for us to look at them all so I will discuss only one, The One that is probably favored by most users of Debian based distros. Synaptic is a graphical front end for apt-get and installs .deb packages that it automatically downloads from repositories. It can also install .deb packages downloaded by the user without using Synaptic to obtain them.

Install it with
apt-get install synaptic
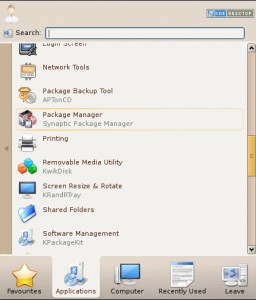
Run it by clicking its icon in your programs menu or by pressing “Alt+F2” (or open a terminal) then entering “synaptic”.

Once it’s running, press the “Reload” button on the top left, let it update your package list then choose the packages you wish to install or remove by left or right-clicking them and selecting an option.
Beyond simple point’n’click software installation, you can
- enable, disable and add extra repositories with Synaptic’s Repository Manager located at Settings>Repositories
- fix broken packages via Edit>Fix Broken Packages
- view a package’s details by right-clicking its name then selecting “Properties”
- lock a package version by selecting the package (left click it) then navigating the top menu bar to Package>Lock Version, and
- upgrade all software and upgrade your system.
It does a lot more too but this article’s scope is limited to software installation and removal so I won’t discuss the rest here.
Synaptic is very easy to use and the best way to learn it is to install it and play with it.
Package managers used by other Linux versions include:
- Portage (Gentoo)
- Yum Extender (RPM packages), and
- many, many more exist.
Command Line Package Managers
There are three that are used by Debian based distributions:
Some other Linux distributions use
- Yum – used by Fedora and has the same commands as Apt.
- Emerge – used by Gentoo.
I will only discuss the ones used by Debian distros, namely, Apt, Aptitude and dpkg.
Advanced Packaging Tool, APT
Apt is a series of tools that enable .deb packages to be installed onto a Debian based system and .rpm packages onto one that uses RPM’s. If you open a terminal and type “man apt” you will get a bit of information about it and if you type “apt -h” you will get a bit more info about it; neither of them are very instructive (use Shift+Q to quit the man or help page).
The most frequently used apt commands are to
- update the package list
sudo apt-get update
sudo apt-get install PACKAGE-NAME
or
sudo apt-get install PACKAGE-ONE PACKAGE-TWO PACKAGE-THREE ETC
sudo apt-get upgrade
sudo apt-get dist-upgrade
sudo apt-get build-dep PACKAGE-NAME
sudo apt-get remove PACKAGE-NAME
sudo apt-get purge PACKAGE-NAME
sudo apt-get clean
sudo apt-get autoclean
sudo apt-get autoremove
sudo apt-get check
sudo apt-get install -f
sudo apt-cdrom add
Some useful extra commands are
- If you want a list of all the software installed onto your system through apt (or dpkg), type
apt-cache pkgnames
apt-cache pkgnames | sort | less
apt-cache pkgnames | sort > ~/Desktop/package-list.txt
DPKG – the Debian Package Management System
Dpkg is the main package installer used by Debian based systems. Most other package managers are front ends for dpkg; apt is no exception. Consequently, most package managers share some files with dpkg such as repository source lists e.g /etc/apt/sources.list and the package status list /var/lib/dpkg/status. In the main, apt is preferred over dpkg even though dpkg is the actual installer. However, dpkg is useful when apt screws up or a system crash occurs during software installation which inevitably results with poorly configured software. The commands required to install, remove, reconfigure and fix a broken or a partial package installation are the only ones I will demonstrate here:
- To install a package
sudo dpkg -i PACKAGE-NAME
sudo dpkg -r PACKAGE-NAME
sudo dpkg --configure PACKAGE-NAME
sudo dpkg --configure -a
sudo dpkg-reconfigure PACKAGE-NAME
Whenever apt, aptitude, Synaptic or any other package manager is unable to install software due to dependency conflicts or other issues like “internal compiler error: Segmentation fault”, you should remove the conflicted software with “dpkg -r PACKAGE-NAME”. More often than not, it will be the only sane way to fix your regular package manager; and use “sudo dpkg –configure -a” to configure uninstalled software whenever your regular package manager crashes during software installation.
More information about dpkg is available here.
Aptitude
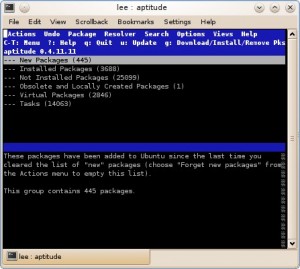
Aptitude is another front end for dpkg. It provides easy access to dpkg’s functions via both command line controls and a menu driven terminal interface (think along the lines of DOSShell). Aptitude’s command structure is roughly the same as that used by apt. Being a front end to dpkg it uses the same repository source list as dpkg and apt.
Here are a few examples to give you an idea of how similar Aptitude’s commands are to apt’s commands:
- To update the package list
sudo aptitude update
sudo aptitude install PACKAGE-NAME
sudo aptitude install --reinstall PACKAGE-NAME
sudo aptitude remove PACKAGE-NAME
sudo aptitude purge PACKAGE-NAME
sudo aptitude full-upgrade
sudo aptitude clean
sudo aptitude hold PACKAGE-NAME
To learn more of Aptitude’s commands, open a terminal and type
aptitude --help
or
man aptitude
To use Aptitude’s menu driven interface, open a terminal and type
sudo aptitude

Aptitude’s menu is activated and deactivated by pressing
Ctrl+T
Menu navigate is done with the cursor keys to select items and the enter key to activate them. The Tab key moves between interactive options, the “+” key selects a package to be installed, the “-” key selects a package for removal and the “=” key specifies a package to be held.
To quit Aptitude, type
Ctrl+C
The most commonly used commands within Aptitude are:
- To update your package list
Ctrl+T
Menu>Update Package List
Ctrl+T
Menu>Install Packages
press Ctrl+T
Menu>Install Packages
Ctrl+T
Search>Find
You will discover short-cut keys as you familiarize yourself with the program.
Although Aptitude is less mentioned than apt and apt-get, it is the preferred method, above all others, of installing software into Linux. One reason for this is that Aptitude records any dependencies installed when packages are installed so Aptitude removes them automatically once those dependencies have are no longer required by any installed packages. A second reason for Aptitude’s preferential use is that it pays attention to software packages when their details suggest their functioning might be enhanced by the installation of optional extra packages. It’s worthwhile checking Aptitude’s package installation suggestions at least once per month to ensure your system is not missing out on anything through poor package management via other package managers.
Source Code installers
Some software is best installed, or can only be installed, from source code. To many people, this method of installation is as off-putting as dating a corpse. Luckily it is not as complicated as it looks and 99% of the time we need only unzip the source-code to a directory, open a terminal and type a few commands to complete an installation. We do not usually need to edit any configuration or setup files to ensure success.
Some of the reasons you might want to install from source-code include
- unavailability of software through a package maintainer
- a need for a newer software version than the one available through a package maintainer
- the package maintainer’s version is incompatible with a computer system’s architecture
- the package maintainer’s version is broken, and/or
- the package manager is broken or inaccessible and the only way to fix it is to install software from source
A big advantage of installing software from source is that the end product is tailored to the system that builds it rather than the package maintainer’s system that built the one available for installation through a package manager.
The main disadvantage of building from source is that a system’s package manager is unaware of the software’s presence; this leads to the second disadvantage: source built software does not usually automatically update whereas package managed software does (via a package manager).
Check that software you wish to install is not available through your preferred package manager before you install from source-code. If it is available through your package manager decide whether the source-code offers real benefits over the package managed version.
Down to the Nitty-Gritty
The most important piece of information to remember after installing any software from source code is to register it with the system by entering “sudo ldconfig” into a terminal. That command will also get rid of many installation errors – if software fails to install due to an unspecified error or a GCC or G++ error, just enter “sudo ldconfig” into a terminal then retry the installation process.
Theses instructions are written for the command line but can easily (mostly) be carried out with a file browser. I suggest you follow along with a file browser and enter the commands into a terminal.
So, you’ve downloaded your source-code and it is packaged, as they usually are, in a compressed file in either a .tar.bz, .tar.bz2, .tar, .zip or .gz format:
- Find somewhere to unpack it:
Unpack it somewhere under your home folder so that you do not need to be a route user to manage it. It is best to create a common directory where you can unpack all source-code packages that you download. I use a directory called “installed”. You can call your source-code directory anything you want. Most people use a directory called “src”. This directory is sometimes already present, if it is not then I suggest you create it with the terminal command:
mkdir ~/src
The tilde symbol “~” represents the logged in user’s home directory e.g /home/michael is the same as ~/michael and /home/simone is the same as ~/simone
mv DIR/FILE ~/installed
Replace FILE with the file’s name and DIR with the file’s directory location
for example, if the file called source-code.zip is on your desktop, you would type
mv ~/Desktop/source-code.zip ~/src
cd ~/src
tar -zxf FILE.tar
tar -jxvf FILE.tar.bz
tar -jxvf FILE.tar.bz2
tar -zxvf FILE.tar.gz
unzip FILE.zip
- find it by listing the files in the directory
- then cd to it
- list all the files in the directory
ls -1
that is a “one” not a lowercase “L”
cd DIRECTORY-NAME
ls -1 -a
If only one folder is listed, change directory to it then retype “ls -1 -a”.
Some source-code packages come with instructions. Look for files called “readme”, “install” or “instructions”. Occasionally, the instructions are in a separate directory called “docs”. You have the option to either read the instructions to discover any needed dependencies and learn about any special methods else you can skip to the next step, cross your fingers and hope for the best.
If you do decide to read the instructions, type “more” followed by the file name to bring them up, e.g
more readme
If you do not bother to read the instructions, look through the list of files and see if any look like these:
That list relates to the setup instructions listed below and is in order of usage preference e.g if you see a file called “configure” then use the set-up instructions listed under “configure”, if the only one you recognize is “setup.py” then jump to the set-up instructions for “setup.py” but if you see both one called “setup.py” AND one called “configure” then first try the instructions for “configure” before you try the ones for “setup.py”.
For any of these set-up instructions, if any errors occur check the installation output and look for instances of “Looking for….not found” and “Error”. Unfound items are usually required dependencies, optional libraries or alternative libraries to the ones being used. Install those missing files and you will usually resolve the fault. Often there are many warnings, this is not unusual and are not typically anything to worry about.
Configure
This is the most common installation method. This process configures the files for a system, compiles the installation binaries, installs the binaries, cleans the source folder of unneeded files created by the previous steps then registers the binaries for use by the rest of the system. Open a terminal and type, singularly
./configure
make
sudo make install
make clean
sudo ldconfig
Make
Follow the instructions for Configure but skip the “./configure” step.
Cmake
Follow the instructions for Configure but replace “./configure” with “cmake”.
Qmake
This one usually requires an external build directory. If it does, see the section entitled Using an External Build Directory, otherwise follow the instructions for Configure but replace “./configure” with “qmake”.
Bootstrap
Follow the instructions for Configure but replace “./configure” with “./bootstrap”.
Setup.py
This is nice and easy, just type
python setup.py install
.Sh
A .sh file is a shell script. To use it you must first make it executable
chmod u+rwx FILE.bin
Then run it by typing
./FILE.sh
On some systems
bash FILE.sh
or
sh FILE.sh
.bin
This is a binary file. To use it you must first make it executable
chmod u+rwx FILE.bin
Then run it by typing
./FILE.bin
.jar
This is a java file. To use it you must first make it executable
chmod u+rwx FILE.jar
Then run it by typing
java -jar FILE.jar
.pl
This is a perl script. To use it you must first make it executable
chmod u+rwx FILE.pl
Then run it by typing
perl FILE.pl
Or, sometimes
FILE.pl
Using an External Build Directory
The old “we really want you to install this great software but wanna make it hard, real hard, for ya” one.
Some source-code must be built from an external directory. The build directory cannot usually be a sub-directory of the source-code’s directory. The way to build source-code in an external directory is as simple as calling the configure or make script from an external directory.
- Let’s assume you have your source-code in
~src/source-code/
~/src/source-code-build
- Move up a directory
- Make a new directory with the same name as your source-code’s directory but suffix it with “build”
- Enter this new directory
- Then call the configure or make script.
cd ..
mkdir DIRECTORY-build
cd DIRECTORY-build
Use the instructions as provided for each build method listed above but prepend the first command (only the first command) with the directory path to the configure or make script in the source-code’s directory, for example
~/src/DIRECTORY/configure
qmake ~/src/DIRECTORY/
cmake ~/src/DIRECTORY/
When Things Go Wrong
Something usually goes wrong when the instructions are not read and followed correctly, if something does go wrong and the software fails to install you should check the terminal output for hints of where the installation failed (including the old “internal compiler error: Segmentation fault”) then install any missing dependencies before typing
make distclean
make confclean
sudo ldconfig
Retry the installation. If it still does not install, rerun the installation but use “sudo make” instead of “make”.
Whenever apt, aptitude, Synaptic or any other package manager is unable to install or uninstall software due to dependency conflicts or other issues created by another software package, you should remove the package that is causing problems by typing
dpkg -r PACKAGE-NAME
Your system will be left with unconfigured or partially configured software if your computer of package manager crashes while software is being installed so configure the software by typing
sudo dpkg --configure -a
The check that the software you were installing prior to the crash has been installed.
That magic command “dpkg -r PACKAGE-NAME” would have saved me two days of labor had I realized to use it when my computer had distribution upgrade problems. I suggest you remember it because it will get you out of many jams very quickly.
If the installation of one or more packages is blocking the installation of other packages then you should put the problem packages on “hold”. You can usually tell that packages are failing to install due to one or more problem packages because your package manager will state “X packages held back” or something similar to that. The problem package will be one of those that are not being held back. Use Aptitude to put it on hold and the other packages will miraculously become unheld and installable.
Put a package on hold with
sudo aptitude hold PACKAGE-NAME
or, use Aptitude’s graphical frontend. Start it with
sudo aptitude
then
- Press “Ctrl+T” to access the menu
- Press “Return”
- Use the arrow keys to navigate to the suspect package
- Press the “equals” key i.e “=” (the package to be held should now change color)
- Press “Ctrl+T” then press return
Any packages that are ready to install but were stuck due to the (now held) problem package will now install.
Segmentation Faults
These happen all too frequently. I’ve met my fair share of them and have found several solutions. If you get any installation errors that look like these:
Ouch! Got SIGSEGV, dying..
Segmentation fault
Segmentation faulty tree… 50%
or just the plain old
Segmentation fault
Or your package manager nearly starts but crashes just before it fully loads then you will need to use one of these solutions
- Open terminal and type
sudo ldconfig
- If that doesn’t work, type
sudo rm /var/cache/apt/*.bin
- Then use apt-get remove to uninstall your package manager
- Finally, use apt-get install to re-install your package manger

