Every forum I help in, every client I speak with and every new WordPress user I meet invariably asks for WordPress help about at least one of these “how do I use WordPress” subjects.
What follows is a small collection of tips, tidbits and help for WordPress users. This would have been a simple list but it kept growing and growing like Pinocchio’s nose the more I remembered the things I wish I knew when I began using WordPress. This post could have been spread over 5 posts but that wouldn’t have been in the JournalXtra spirit of long post writing.
Each subject section has a quick tips list followed by more in depth detail about its subject.
There’s a very nice WordPress problem solving flowchart for download in the last part of this post. I spent long time making it so I know you’ll find it useful.
Questions this post answers
Some of the questions this post answers about WordPress include:
- How do I install plugins in WordPress?
- How do I install themes in WordPress?
- Where can I get more plugins and themes from?
- What are the best tips for using WordPress?
- How do I use the WP media uploader?
- What’s the media uploader for?
- How to add links in pages and posts?
- What is ‘nofollow’ for?
- How do I ‘nofollow’ WordPress links?
- What’s the best way to style text?
- How do I fix WordPress?
- How do I get my site back?
- What should I avoid doing when using WordPress?
Installing plugins and themes
Plugin and theme installation are what make WordPress fun to use and easy to adapt to the needs of different blogging and business models. Plugin and theme installation is easy with WordPress.
Top plugin and theme tips for WordPress
- Most plugins have settings. Plugin settings are usually found in Dashboard > Settings or Dashboard > Tools or anywhere in the left hand side of the dashboard.
- When you install a plugin, check it’s options. If it needs to be configured, configure it.
- Some plugins need to be enabled in their configuration panel before they work.
- When you install a theme, check through its settings. Settings are usually found in Dashboard > Appearance.
- When a plugin or theme is ready to upgrade, read the release notes so you know what to expect in the new package.
- When you upgrade a plugin or theme, check its settings. Upgrades might add new features that need to be configured.
- If your theme has SEO features, disable them or don’t use them. Install a separate SEO plugin like Ultimate SEO.
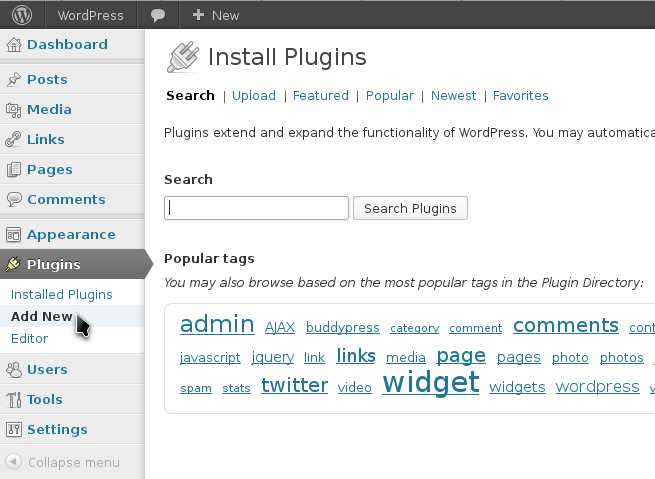
Plugins and themes can be installed from the WordPress repository. The repository is a library of free WP addons. You can search it, find a plugin or theme you’re looking for and install it all from your WordPress dashboard.
The plugin repository is searched by going to Dashboard > Plugins > Add New.
The theme repository is searched by going to Dashboard > Appearance > Themes > Install Themes.
If you can’t find the plugin or theme you want in the repo you can get one from outside of the WP repository and upload it from
- Appearance >Themes > Install Themes > Upload
- Plugins > Add New > Upload.
I use CodeCanyon for plugins when I can’t get what I need from the WordPress repository and Genesis from StudioPress for my theme framework.
When you install a new theme, remove any old CSS edits added into plugins like header-footer otherwise those CSS edits will interfere with the layout of your new theme. Note that the CSS module in Jetpack automatically disables custom CSS added with it when a theme is changed. Advice for adding CSS is given below.
Adding links to pages and posts
Adding links is easy. Doing it right is an art.
Top tips for linking
- Link to pages within your site to improve SEO.
- ‘nofollow’ links to advertisers and sponsors.
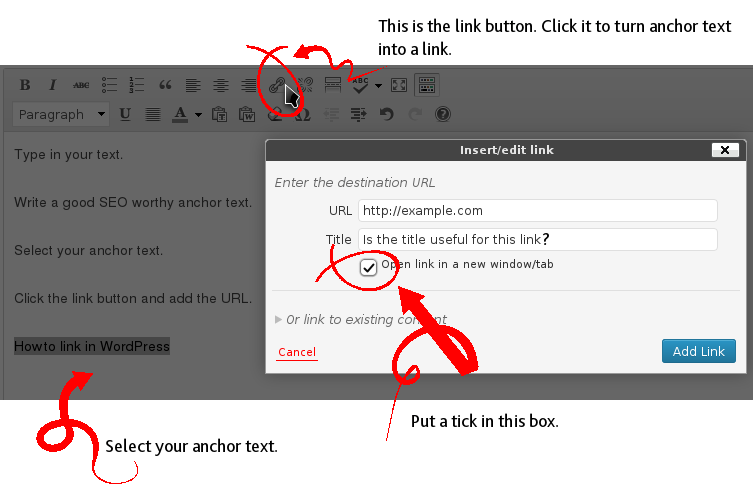
- The anchor text is the text that is clicked.
- The link title is the text that pops up when you hover over link anchor text.
- Use unique anchors and titles where possible.
- Give your links titles if the titles are useful for screen readers used by the blind.
- Give your links titles if the titles add some useful information or encouragement to click to your readers.
- If link titles are not useful as described above, don’t use titles.
There are three types of linking:
- Internal linking where you link to pages within your site.
- External linking where you link to resources you found useful or that your readers will find useful.
- External linking to advertisers and non useful resources.
Linking to posts and pages within your site helps search engines find and crawl your content and it helps cut down content duplication when you refer to an already existing post that explains something your readers might need to know to aide their understanding of the outlinking post. It also helps increase your page views and helps keep readers on your site as they follow your links to more content on your site.
Linking from your site to other sites is good. It helps your readers find resources you find useful, it helps you give credit to those who have helped you write your posts and it encourages other sites to link to you.
But, if you link to products and websites that you advertise for money then you need to make sure search engines do not follow the advertorial links or it will damage your site’s reputation with search engines like Google.
Stop search engine’s following links by giving links a nofollow attribute by using the rel=”nofollow” tag within anchor links:
<a rel"nofollow" href="http://example.com/" title="">No Follow Ad Links and Banners</a>
You can edit links by switching from the Visual editor to the Text editor.
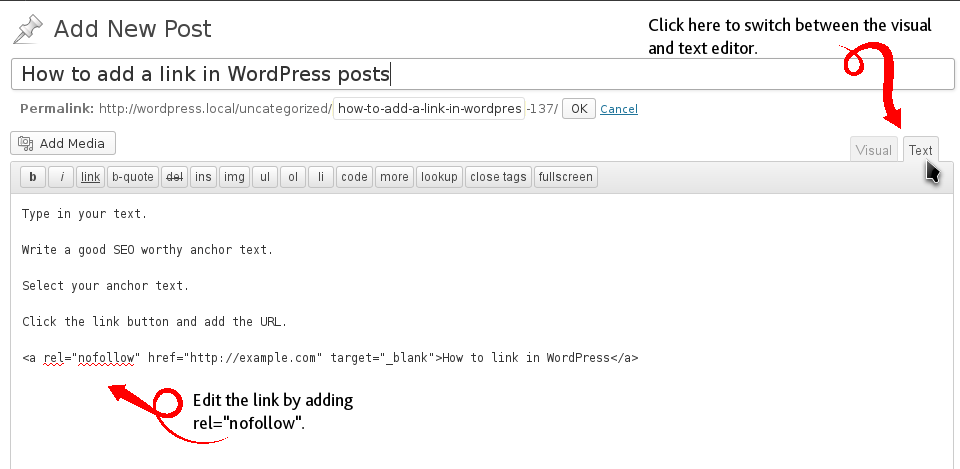
There are plugins in the WordPress repository that will help with this. Go to Plugins > Add New then search for ‘nofollow’.
File storage – the Media Uploader
Did you know the WordPress media uploader can store more than images? It can store videos, music files, text documents, PDF documents, zip files…
Top tips for WordPress media management
- You can upload almost anything into your Media Library.
- Do not upload bitmap images to the WP Media Library. WordPress does not like them because it can’t resize them.
- Never link to attachment pages i.e WordPress formatted pages that display a single image. Link to the image or media file instead.
- Install a lightbox plugin so your images and media display in pop-ups when clicked. Lightbox effects only work when you link embedded media to its media file.
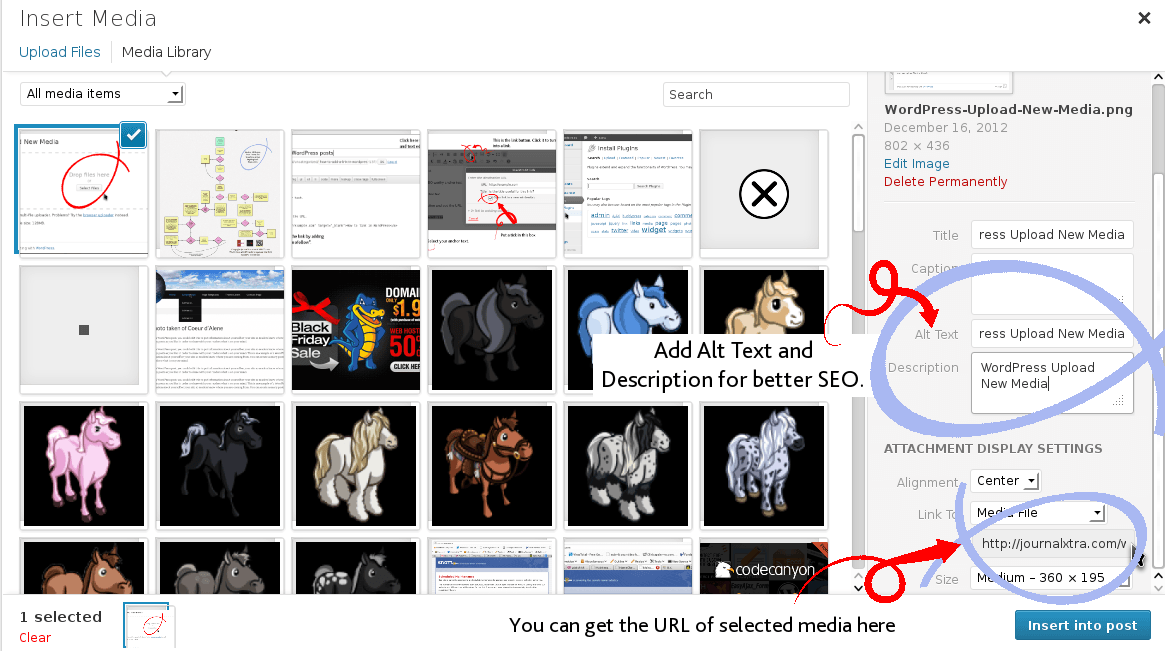
- Before you upload, rename your file so its title describes it. Do not hyphenate spaces, leave spaces intact.
- After upload, add a description and alt text for your media. This helps with SEO.
- When you configure WordPress, go to Settings > Media and untick “Crop thumbnail to exact dimensions…”
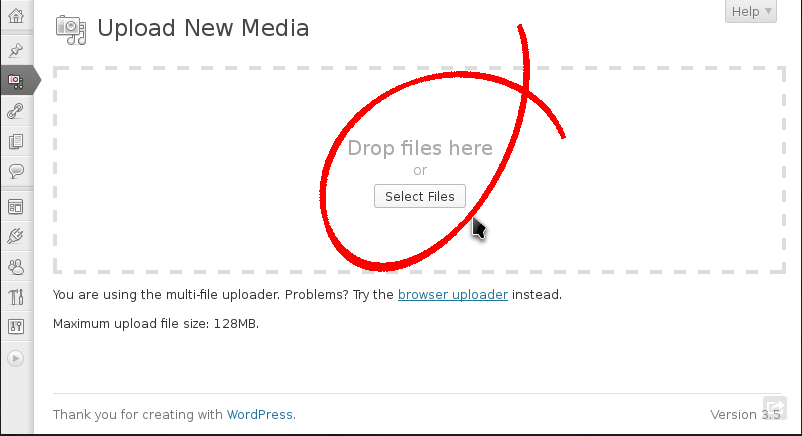
Almost anything you want to store and make available for download or use within your site can be uploaded and stored by going to Media > Add New then dragging and dropping files into your Media Library.
For most WP users, there should be no reason to upload files directly to the host server using a server cPanel or an FTP program unless a file is bigger than the allowed maximum upload size.
The Media Library provides links to the files uploaded with it. Use those links where you need a file’s URL for an external program or page, CSS image or plugin config field.
Font styles and colors
When you create a new post or page you are presented with an MS Word style text editor. In WordPress, this editor is called the Visual Editor. It uses a Javascript package called TinyMCE to make writing content easy.
Top tips for using the Visual Editor
- Install the plugin Ultimate TinyMCE to give your editor a taste of awesome.
- Want building post and page layout to be like using Lego? Install Visual Composer.
- Do not use the visual editor to change text color, text background color or to format table designs. The reason for this is explained below.
- Control font size and color bu choosing a text format. Use heading text, bold text and italic text for emphasis. Use CSS to control how those font types look.
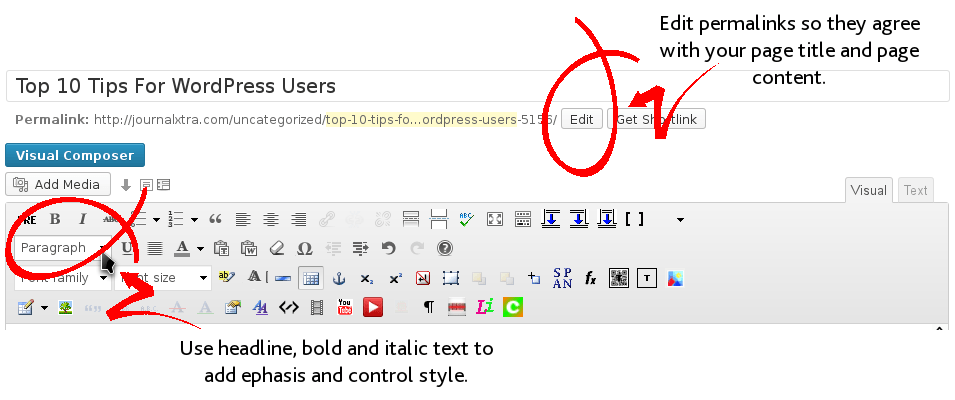
- For SEO purposes, make sure your post title says what the post is about.
- Edit your permalink. Your post URL permalink must say what your post is about. People check URLs before clicking search engine results.
- Use headlines throughout your text to help break it into neat, readable sections.
If you make color changes using the visual editor you will need to go through all your old posts to edit colors when you change your theme. Target heading, bold, italic, underlined, strike-through, link anchor text and tables with CSS color, size and other style attributes.
CSS style edits can be added to your site using Jetpack or, sometimes, your theme’s settings panel. Once you install Jetpack, navigate to Jetpack > Settings > Custom CSS and click Configure or to Appearance > Customize > CSS. Example edits (you’ll need to adjust these to suit your needs) are:
#content h1 {font-size: 15px;color: black;text-decoration: none;}
#content h2 {font-size: 15px;color: black;text-decoration: none;}
#content h3 {font-size: 15px;color: black;text-decoration: none;}
#content h4 {font-size: 15px;color: black;text-decoration: none;}
#content h5 {font-size: 15px;color: black;text-decoration: none;}
#content h6 {font-size: 15px;color: black;text-decoration: none;}
#content p {font-size: 15px;color: black;text-decoration: none;}
#content a {font-size: 15px;color: black;text-decoration: none;}
#content a:link {font-size: 15px;color: black;text-decoration: none;}
#content a:visited {font-size: 15px;color: black;text-decoration: none;}
#content a:hover {font-size: 15px;color: black;text-decoration: none;}
#content a:active {font-size: 15px;color: black;text-decoration: none;}
#content strong {font-size: 15px;color: black;text-decoration: none;}
#content table {font-size: 15px;color: black;text-decoration: none;border: 1px solid black; border-collapse:collapse;}
#content th {font-size: 15px;color: black;text-decoration: none;border: 1px solid black;}
#content tr {font-size: 15px;color: black;text-decoration: none;border: 1px solid black;}
#content td {font-size: 15px;color: black;text-decoration: none;border: 1px solid black;}
Diagnosing and fixing problems
Your website will develop bugs from time to time. Bugs are usually plugin and theme incompatibility issues. Most WordPress bugs show after plugin, theme and WordPress upgrades. Almost as often the cause of faults are plugin and theme installations.

You might find a plugin feature doesn’t work after a plugin upgrade. The problem might not be the plugin that has been upgraded but a plugin that the upgraded plugin conflicts with.
The general route to solving WordPress bugs is to track down the cause. Take the following steps, testing the issue has been fixed until one of the steps fixes the problem:
Clear your browser cache, reload your site and test for the issue again.
Try the site in a different browser. If you usually use Firefox, try Chrome or Opera.
Disable all plugins. If the problem is fixed, re-enable the plugins one-by-one and test the site after each plugin has been reactivated until you find the plugin that causes the fault. When a problem plugin is found, leave it activated but disable the now active plugins one-by-one and test the site after each deactivation to check whether any of the reactivated plugins conflicts with the one you activated that caused the fault to recur.
Switch the theme back to Twenty Twelve. If the error no longer shows then your theme might have a bug in it. If all plugins are currently inactive, re-enable them one-by-one to see whether they work well with the Twenty Twelve theme.
Go to Dashboard > Updates and click the Re-install Now button to re-install WordPress. This will not delete any posts, pages, plugins or themes; it only restores the original WordPress core files. Re-installing WP in any other way could delete your data.
If the fault still exists after clearing your browser cache, trying a different browser, disabling all plugins, switching back to the default Twenty Twelve theme and re-installing WordPress then you probably have a fault with your server or your database. At this point, you should contact me through JournalXtra.com or through WP Service Masters.
Plugins, themes and disasters! If you install or upgrade a WordPress plugin or theme and your site becomes inaccessible, log into your cPanel file manager or use an FTP file manager to browse to /wp-content/plugins/ or /wp-content/themes and rename the directory for the theme or plugin(s) that you installed or upgraded. This will deactivate it (them) and allow WordPress to load again.
Want a massive wall-sized version of the above flowchart? [donate]Donate a few dollars[/donate] to JournalXtra to get the original 14mb 4300×5200 pixel poster to download, print and put on your wall.