WordPress multisite turns a website into a multiblogger machine like wordpress.com where one domain with one WordPress installation can be used to create up to millions of blogs on subdomains or subdirectories.
Multisite is hidden part of WordPress that has to be activated manually through a few edits to the site’s wp-config.php file.
There is no button in the site’s dashboard taht can be used to activate WP multisite. You will need FTP access to your server or a server control panel that lets you view and edit files stored on your server.
These instructions are easy to follow. You should have multisite activated in less than 10 minutes work.
Questions this guide answers
- How do I activate WordPress multisite?
- How do I make a wildcard subdomain in cPanel?
- How do I send visitors to non existent blogs to my site’s homepage (or any other site or page)?
- Can I use different domains for subdomain sites?
How to activate multisite
- Disable all plugins. You can re-enable them after multi-site has been configured. Settings will return on reactivation.
- Access the files on your server and browse to your domain’s root directory. Look for the file wp-config.php
- Activate the multi-site features of WordPress by adding this line of code to the bottom of wp-config.php
/** Enable or disable Worpress Multi-site features **/
define('WP_ALLOW_MULTISITE', true);
Put it just above the line that reads
/* That's all, stop editing! Happy blogging. */
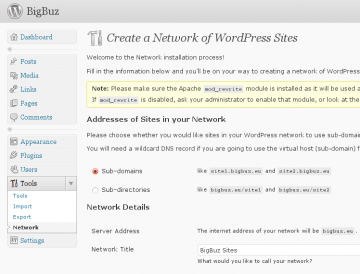
- Refresh your WordPress dashboard then visit Tools>Network. You will see a screen that looks similar to the one in the picture below. Read onwards before you make any configuration changes.
If you want to install your additional blogs on virtual sub-domains instead of sub-directories you will need to create a wildcard DNS record on your server to enable the virtual host (sub-domain) functionality of WordPress. Your server must support wildcard DNS records for you to do this. Namecheap hosting supports wildcard DNS.
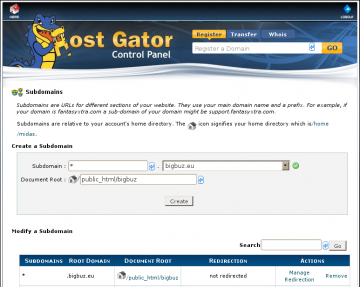
Follow these instructions to create a wildcard DNS record for a domain.
- Select “sub-domains” under “Domains” in CPanel.
- Enter an asterisk “*” in the sub-domain’s name field.
- Select the TLD the wildcard DNS is to be set up on.
- Enter the server location address for the wildcard folder, e.g. /public_html/bigbuz/.
- Click “Create”.
Now you need to configure the newly activated WordPress Network Settings:
- Navigate to the network settings page in your WordPress dashboard under Tools>Network.
- Choose whether you want to use sub-domains or sub-directories for the new sites you add to your network.
- Type a name for your network of sites.
- Set your admin email address.
- Click “Install”.
After a minute or two you will see a configuration screen. Back up your .htaccess and wp-config.php files before you proceed to follow the instructions provided on that screen.
Next, create a directory called blogs.dir under your site’s wp-content directory. The address will look like wp-content/blogs.dir/.
Lastly, log out then log back in.
Congratulations on your new WordPress Multi Site installation!
Now you need to go through your settings to enable or disable the new options provided by WordPress MS. Use the Network Admin link at the top left of your admin screen to edit your network’s settings. Browse around, have a play and you will soon realize how intuitive the Network Admin interface is to navigate.
Maintaining your site’s security is highly important. A quick guide to hardening WordPress against threats is available here.
Extra tip
Prevent visitors to non-existent sites seeing 404 error pages, redirect them to a URL of your choice by adding the below code to the bottom of your wp-config.php file:
/* Send visitors to non-existent blogs here */
define( 'NOBLOGREDIRECT', 'https://journalxtra.com/' );
Change https://journalxtra.com/ to the URL you want visitors of deleted, deactivated and non existent sites to be directed to.
Using multiple domains
WordPress MU Domain Mapping lets multisite users map an external domain name onto a child site within your multisite network.
Here’s how to install it:
- Download the plugin
- Copy the file sunrise.php from /wp-content/plugins/wordpress-mu-domain-mapping/
- Place sunrise.php in your site’s /wp-content/ directory
- Edit your wp-config.phpfile to add this code to the bottom of it:
define( 'SUNRISE', 'on' );
- Activate the plugin from your plugin admin panel
Note
This guide was first written in 2010 when WordPress 3.0 launched as the combination of WPMU and regular WordPress. The guide was last updated 11th November 2012.
What’s next?
Leave comments and tips in the usual place.


