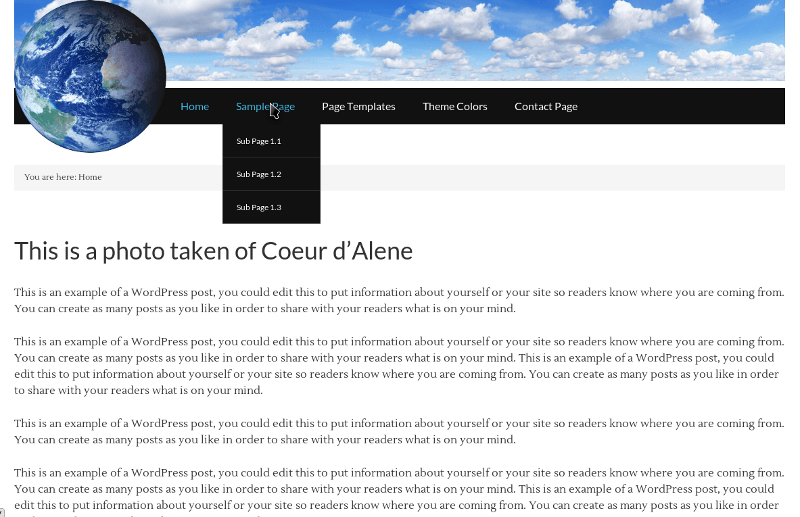
 Every once in awhile I’m asked to make the header logo image in a WordPress site jut out of the header area so it overlaps whatever is below it.
You might think it’s impossible. It’s not. Look at the image to the right for proof.
To make the header image hang over and stick out of the header area we need to remove the Genesis header action and replace it with a custom header action.
The trick is to remove the default header function and replace it with a new one that adds a second widget area to the header. Using a widget area lets us place a logo image in a text widget then use CSS to make the image pop out of the header box and hang over whatever is below it.
A bonus to replacing the default Genesis theme header function is that we can use a header image slider, a header parallax slider or even replace the header with a video. The options are limited by imagination only.
The Genesis theme header area usually shows a site’s logo image and it usually contains a right header widget area. Below here are two options for replacing this default header:
- One full width widget area
- Two 50% width widget areas
You can register and add as many widget areas as needed but one or two will meet most needs.
Don’t have Genesis? Get it here. It’s the best WP theme framework I’ve ever used.
Questions this page answers
- How do I add more widgets to the Genesis header area?
- How do I make a custom Genesis theme header?
- How do I Make a two widget header in WordPress?
- How do I put a header logo image into my Genesis theme so it sticks over the header area?
- How do I make a transparent header image hover over my menu?
- How do I make an image in my header that stands out?
- How do I give my WordPress site a header that displays over the content below the header?
Instructions and caveats
- Always work on a Genesis child theme.
- All work is done in /wp-content/theme-name/functions.php and /wp-content/theme-name/style.css.
- In these examples we remove the site title and site description from display.
- Use HTML to make the new header clickable.
- Any code that begins genesis_register_sidebar registers a widget area for use in Appearance > Widgets. You can place it higher up in functions.php to make it display closer to the top of the widget area list in the Widgets admin page.
Option one: one full width widget area
I would use this full width option to replace the header area with a slideshow, video or just a menu.
This header has a widget with the CSS class header-full.
The regular header is completely removed i.e no header image is displayed unless it is placed in the widget area.
- Open functions.php
- Add this code to the bottom of it:
// Remove Genesis header and and replace with custom full width header genesis_register_sidebar( array( 'id' => 'header-full', 'name' => __( 'Header Area', 'theme-name' ), 'description' => __( 'Header widget area', 'theme-name' ), ) ); unregister_sidebar( 'header-right' ); remove_action( 'genesis_header', 'genesis_do_header' ); add_action( 'genesis_header', 'genesis_do_new_header' ); function genesis_do_new_header() { if ( is_active_sidebar( 'header-full' ) || has_action( 'genesis_header_full' ) ) { echo '<div class="widget-area header-full">'; do_action( 'genesis_header_full' ); dynamic_sidebar( 'header-full' ); echo '</div><!-- end .widget-area -->'; } } - Save functions.php
- Open style.css
- Add this code to the bottom of it:
.header-full {width:100%!important;float:left!important;clear:both;margin:0;} .header-full {position:absolute;z-index:99999!important;} #header {height: 100px!important;} - Save style.css.
The second CSS line can be removed if you do not intend the content of the widget area to hang outside of the widget area.
Option two: two widget areas at 50% width each
This is useful when you need somewhere for an image and somewhere for a header menu.
This custom Genesis theme header area has two widgets. One has the CSS class header-left and the other has CSS class header-right.
This option does display the regular custom header image as the background to the wdigets. Remove the line do_action( ‘genesis_custom_header’ ); to stop the WordPress custom header image from displaying.
The height of the header is configured in functions.php with the code:
/** Add support for custom header */
add_theme_support( 'genesis-custom-header', array(
	'width'	 => 940,
	'height' => 120
) );
Check your theme’s CSS for any height values for the header, title or title area.
Replace the header with a custom header
- Open functions.php
- Add this code to the bottom of it:
// Remove Genesis header and and replace with custom two widget header genesis_register_sidebar( array( 'id' => 'header-left', 'name' => __( 'Left Header', 'theme-name' ), 'description' => __( 'Left hand header widget', 'theme-name' ), ) ); remove_action( 'genesis_header', 'genesis_do_header' ); add_action( 'genesis_header', 'genesis_do_new_header' ); function genesis_do_new_header() { do_action( 'genesis_custom_header' ); if ( is_active_sidebar( 'header-left' ) || has_action( 'genesis_header_left' ) ) { echo '<div class="widget-area header-left">'; do_action( 'genesis_header_left' ); dynamic_sidebar( 'header-left' ); echo '</div><!-- end .widget-area -->'; } if ( is_active_sidebar( 'header-right' ) || has_action( 'genesis_header_right' ) ) { echo '<div class="widget-area header-right">'; do_action( 'genesis_header_right' ); dynamic_sidebar( 'header-right' ); echo '</div><!-- end .widget-area -->'; } } - Save functions.php
- Open style.css
- Add this code to the bottom of it:
.header-left {width:50%!important;float:left!important;clear:left;margin:0;} .header-left {position:absolute;z-index:99999!important;} .header-right {width:50%!important;float:right!important;clear:right;margin:0;} - Save style.css.
Wondering why we only register one sidebar and not two? The header-right sidebar already exists in the Genesis parent theme’s functions.php. We only need to restyle it.
How to overlay the header image
We will use the two widget header option to make an image in the header hang over the menu.
Overlapping an image over the menu will obstruct the menu items. We need to make sure the menu items remain clickable so we will use CSS to add a left-margin to the first item in the menu.
We will set a definite pixel width for the header-left widget.
This method removes the Genesis right header widget and adds a new right header widget. Doing it like this keeps the left and right widget areas together in Appearance > Widgets.
The header this creates looks like the one in the image at the top of this page.
Put this code into functions.php
- Open functions.php
- Add this code to the bottom of it:
// Remove Genesis header and and replace with custom two widget header unregister_sidebar( 'header-right' ); genesis_register_sidebar( array( 'id' => 'header-left', 'name' => __( 'Left Header', 'theme-name' ), 'description' => __( 'Left hand header widget', 'theme-name' ), ) ); genesis_register_sidebar( array( 'id' => 'header-right', 'name' => __( 'Right Header', 'theme-name' ), 'description' => __( 'Right hand header widget', 'theme-name' ), ) ); remove_action( 'genesis_header', 'genesis_do_header' ); add_action( 'genesis_header', 'genesis_do_new_header' ); function genesis_do_new_header() { do_action( 'genesis_site_title' ); do_action( 'genesis_site_description' ); do_action( 'genesis_custom_header' ); if ( is_active_sidebar( 'header-left' ) || has_action( 'genesis_header_left' ) ) { echo '<div class="widget-area header-left">'; do_action( 'genesis_header_left' ); dynamic_sidebar( 'header-left' ); echo '</div><!-- end .widget-area -->'; } if ( is_active_sidebar( 'header-right' ) || has_action( 'genesis_header_right' ) ) { echo '<div class="widget-area header-right">'; do_action( 'genesis_header_right' ); dynamic_sidebar( 'header-right' ); echo '</div><!-- end .widget-area -->'; } } - Save functions.php
- Open style.css
- Add this code to the bottom of it:
.header-left {width:226px !important;float:left!important;clear:left;margin:0;} .header-left {position:absolute;z-index:99999!important;} .header-right {width:50%!important;float:right!important;clear:right;margin:0;} .first-menu-item {margin-left: 226px;} - Save style.css.
The only difference between the code used here and the code used in Option Two (above) is in the CSS at step 5:
- CSS class .header-left {} has its width set to 226px instead of 50%. Adjust the value from 123px to a width that matches your overhang image’s width i.e if your image is 200pixels wide then you should change the width of header-left {} to width:200px;.
- There is a new CSS class selector of .first-menu-item. This has a margin-left attribute which pushes the menu items toward the right. Change 226px to match the width used for .header-left.
Add the images
- Go to Appearance > Header.
- Select or upload your main header background image (if using one).
- Go to Media > Add New.
- Upload your overhang image. Copy the upload URL.
- Go to Appearance > Widgets.
- Find the Left Header widget area. Drag a text widget into it.
- Put the following code into the text widget:
<a href="http://example.com"><img src="http://example.com/wp-content/uploads/image.png" /></a>
- Change example.com to your site’s domain name. Change the src URL value to the URL of your image.
Indent the menu
- Go to Appearance > Menus.
- Click the button at the top of the screen that reads “Screen Options“.
- Put a tick next to CSS Classes.
- Collapse the screen options menu by clicking Screen Options again.
- Edit the first menu item (click the triangle to expand it).
- Put first-menu-item in the box below CSS Classes (Optional).
- Save the menu.
- Reload the site’s frontend.
If we wanted, we could use the header-right widget to add a menu or another image or anything else.
Miscellany
Your theme might have a height specified for the title area. If so you will need to make the widgets display on top of it by adding this to your CSS:
.header-left {
  position:absolute;
  z-index:99999!important;
}
Done!
Did you find this Genesis header guide helpful? Please comment and let me know.

