GIMP is easy to use after you realise it is primarily an editor and not a painter. Think ‘collage’ more than ‘sketch’.
GIMP can be used to create masterpieces of digital art but to approach GIMP primarily as though it were a souped-up version of Paint will leave your mind spinning because it can’t find the tools needed to, err, paint. I didn’t ‘get’ GIMP until I realised this when I first began to use it. Now I use GIMP for most of my image edit needs and to create logos.
I’m a GIMP. Proud of it. Shouting loudly about it. Yes, I am impressed with GIMP. And, yes, I’m British so am well aware what gimp means in British English.
GIMP can be used to edit images, to enhance photos or to create images using icons and cutouts (remember I said to think ‘collage’, not sketch). New features can be added to GIMP with plugins added with the GIMP registry or downloaded from 3rd party sources.
GIMP Features
- Draw straight lines,
- Draw wavy lines (free hand),
- Automatically draw circles, ellipses, squares, rectangles, flowers, polygons, spikes, sine waves and more,
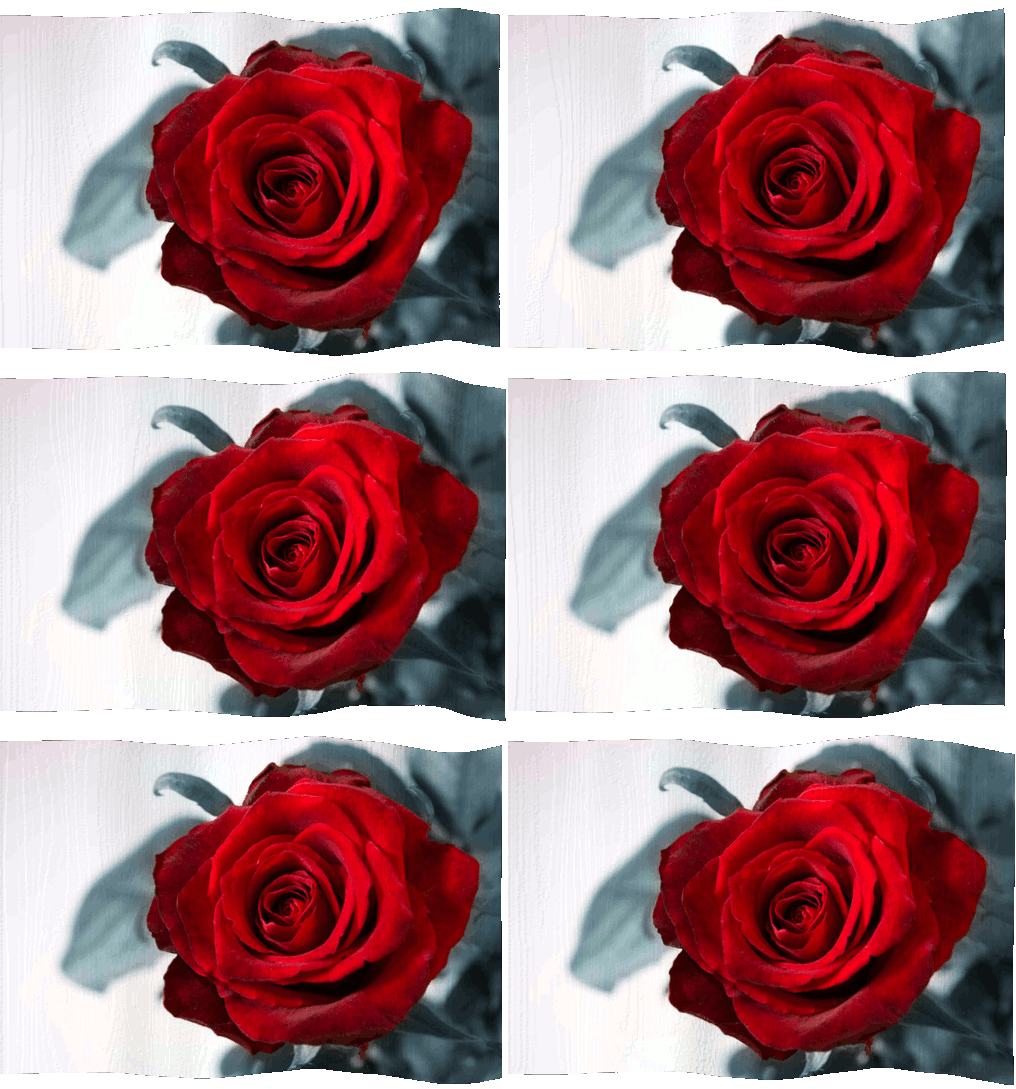
- Automatically create animated gifs like waving flags (from any image), water ripples, flames & fires, melting, rotation,
- Make images 3D or spectroscopic,
- Convert images to various black & white, sepia or monochrome formats,
- Recolor (colorize) black & white images,
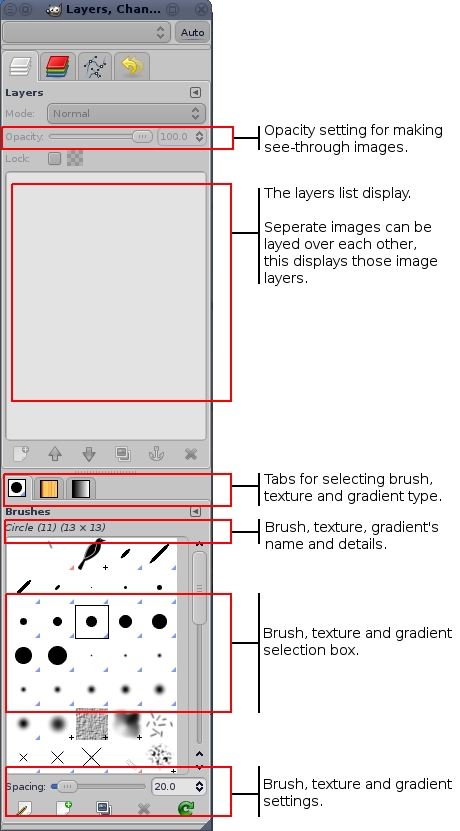
- Vary an image’s opacity (make it see through),
- Texturise images by making them appear to be imprinted on canvass and cloth etc..,
- Add transparency to images (make particular parts and colors of an image see through),
- Add watermarks,
- Remove backgrounds and dynamically cut out image elements with intelligent cutting,
- Improve or worsen image quality,
- Add special effects, borders, mirroring,
- Make really cool logos,
- Make web image backgrounds and automatically create HTML backgrounds out of images, and
- Convert between file formats (PNG to GIF and JPEG to PNG etc…)
And so, so much more.
It’s taken me 2 years to get around to using GIMP for more than changing PNG’s and JPEG’s into GIF’s. I wish I hadn’t been so lazy because I deprived myself of such a good tool that’s taken less than one week to learn to use. In fact, it took about two days.
Now for the GIMP Tutorial
At the time of writing this, the current stable version of GIMP is 2.6.7. Installation is easy:
Windows users should visit the GIMP download page to download the latest package then follow the installation instructions that come with it;
- Linux users can open a package manager (Synaptic or KPackageKit) and type GIMP in the search bar to find the GIMP package and any plugins that may be provided by the repositories. It can be installed from the command line using (in Ubuntu) sudo apt-get install gimp or similar, depending on the Linux distro.
- Linux users can also visit the GIMP download page to download and install GIMP manually. If you do this you will also need to install libgegl, libbabl, libglib, libglib-perl, libcairo, gvfs, libgvfs, libgio (libgio-fam), dbus-glib, exif and the latest intltool. I usually install the development files too just in case they’re needed by plugins e.g libgegl-0.0-dev . Some additional (optional) files are required used by some plugins: liblcms, libpng, libjpeg, libpoppler, libtiff, webkit, libmng, librsvg, libwmf. Full requirements for GIMP’s installation can be found in the installation folder in the file called installation (it has no file type association).
- Once the package is downloaded move it to your opt directory (route/opt) and unpack it in its own subfolder (in Kubuntu, I right-click a package then select extract here, auto detect sub folder). Enter the folder and open a terminal (or right-click the folder and select open terminal here) then type
sudo ./configure sudo make sudo make install - Sudo make could take a long time…
- If you have difficulty accessing the opt directory, open a terminal and type kdesudo dolphin to open the Dolphin file manager in super user mode. Change dolphin to the name of your preferred file manager. Gnome users will need to type gksudo instead of kdesudo.
I’ll explain how to install plugins later.
Get to know GIMP
Run GIMP either through your application menu (eg Start in Windows; or Kicker in KDE) or by typing GIMP in a terminal (command line).
You will now see three window panes that look like the annotated images shown below. The top image is GIMP’s Image Editor pane, its Layers pane is bottom left and its Toolbox pane is (bottom right. Click an image to see its full-sized version.
The GIMP Image Editing Window
Drag and drop an image into the Image Editor. If you don’t have an image to play with, use Google Image Search to find one to download and use.
If you want to create a blank page then go to File>New at the top left of the Image Editor panel. Choose a predefined canvass size or set your own canvass size in the dialogue box that is now visible.
Get familiar with the menus by playing with the available options and tools. I recommend File>Create>Logos and Filters>Artistic. Don’t get frustrated by all the confusing actions, tools and options; just browse and click a few of them. Most of GIMP’s tools will only be available when an image is loaded in the Image Editor.
When you right-click the Image Editor you will see a huge menu pop-up by your mouse pointer. That menu is the same as the top-bar menu.
The menu items I use most are File, Image, Colours and Filters:
- The File menu provides access to tools to create new pages, buttons, logos and Textures etc,
- The Image menu provides access to tools to scale and crop images & layers as well as flatten and merge layers,
- The Colours menu provides access to tools to ” color to transparency” and convert an image’s colour scheme to black & white,
- The Filters menu provides access to loads of effects and textures such as canvass, cloth, paper, oil painting, satin, or mirroring (reflection effects). It’s also where the animation creation tools are accessed – they’re largely automatic so fairly easy to use.
GIMP’s functionality can be extended with plug-ins. Once you’ve installed a few plug-ins you will notice a few additional menus and menu items. Two of those menus will be Script-Fu and Python-Fu which are where a lot of plugins are listed.
Create a logo
This is as easy as 1, 2, 3:
- Navigate through Files>Create>Logos>Starscape,
- Type in your text, select a font size and choose a colour, then
- Click O.K
![]()
As I said, simple. Virtually every other activity – from creating a logo, through adding effects to images and animating GIF’s – is doable in 3 steps:
- Navigate the menu to the creation or effect,
- Adjust the settings, then
- Click O.K.
It’s quick and easy and it’s one of the reasons I’ve fallen in love with GIMP.
Before we go any further you need to learn a little more about how GIMP works.
The GIMP way
Get two pieces of paper. Draw a tree on the first piece of paper and a house on the second piece of paper. Lay one on top of the other.
This is what you’re likely to see: either a tree or a house but not both at the same time. To see one or the other picture you must swap them over, place them side by side or put a strong light behind them.
What if, instead of using pieces of opaque paper, you used semi-opaque paper such as tracing paper or transparent cellophane sheets like the type used for projectors and photographic lens filters? Wouldn’t that be better? You could then layer those pictures to see both together and place them in different locations relative to each other so you could see how they would look in different positions; handy when designing and planning a new project when you don’t want to keep redrawing the same images.
GIMP can work in that way. In fact, it’s designed to work like that: images are built in layers. They don’t have to be, but it makes them easier to edit when they are layered than when they are not. GIMP allows us to have as many layers as a project needs.
Using layers, we can keep repositioning a project’s elements without cutting and pasting; we can put one above or below another; we can make parts (or all) of our layers transparent (completely see-through) or semi-opaque (tinted), we can merge some layers into each other or we can merge all layers in to each other (i.e flatten an image).
As I said earlier, we don’t have to use layers but it is easier for large projects.
To summarize the way GIMP works
- Different elements (images, pictures, picture parts, text etc…) can be put into different layers,
- Layers can be moved around each other (left, right, top, bottom…),
- Layers can be raised or lowered above and below each other, and
- Some or all layers can be merged to flatten them into one layer.
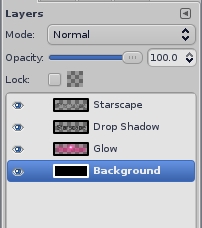
Take a look at the logo you created earlier. Look at the Layers dialogue box. If it isn’t open, use the top menu to navigate to Windows>Recently Closed Docks or Windows>Dockable Dialogues and select Layers.
Below the sliding bar that says “Opacity” you will see a list of 4 layers:
 Logo Title (whatever text the logo displays),
- Drop Shadow,
- Glow, and
- Background.
They are the layers that make-up your logo. Select one of them to highlight it.
Did you expect it to automatically display in the Image editor? I said GIMP isn’t intuitive and that’s part of what I meant.
To make it show in the image editor you can either drag and drop it’s position to the top of the list or you can use the up and down arrows below the list. You can re-order those layers however you want; and by now should see why it’s better to use layers than not.
You can edit any of the images in any of those layers; just select it and edit it. If you prefer to see with less obstruction by the other layers, move the layer you want to edit to the top position in the layers list. Any change you make in the Image editor panel will affect the active (selected) layer only.
Move the Background layer to the top position. The Image Edtor should now show a black layer. Use the Toolbox to change its colour: left-click the big black square to change pen colour then select the paint-pot icon (top right) to use autofil. Left-click anywhere within the black layer displayed in the Image editor window; it should now be painted your chosen colour. Use the Layers window to reposition the layer to the bottom of the layers list.
You will now see the same logo but with a different coloured background. Changes to the other layers are equally easily made: move the layer to be edited to the top of the list of layers, make edits or add effects from the Filters menu then put the layer back to where you want it in the stack of layers.
Common Actions
Let’s take a look at the basic actions you can do with GIMP: draw a “straight” line, select a rectangular or elliptical segment, select an irregularly shaped element, fill a segment with a colour, add transparency to an image, add opacity to an image, create a colour gradient using the Blend tool, add effects to layers and draw shapes like circles, squares and polygons (plug-ins are required to automatically draw shapes).
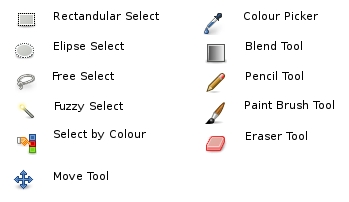
Example tools available from the Toolbox
Drawing a straight line
This is another reason GIMP is not intuitive to use. Its should be easy, right? We should be able to select a “draw straight line” tool and then draw a straight line, shouldn’t we? Silly us, we’ve forgotten that GIMP is an image editor not an arts package.
To draw a straight line we must select a pen, brush or any other free-hand drawing tool, click on the canvass where we’d like a line to start, press and hold shift (a thin path line will display) then click on the canvass where we’d like the line to end.
Select a segment
Click the Rectangle Select or Ellipse Select tool then left-click on the Image editor window near to the segment to be selected, hold-in the left-click button and drag the mouse pointer over the segment being selected until it is fully outlined by the selection tool.
To add other selection areas to the already selected section, hold shift and repeat the action. Doing this will enable you to select irregular blocks.
Selected regions can be edited independently of their unselected counterparts. For example, we can select a region within a photograph and convert that section to black and white without affecting the unselected parts.
Select an irregular region intelligently
Sometimes we might find ourselves with an image that contains an element we’d like to separate from it; perhaps we have a photo of a model but the background isn’t to our liking. To separate the model from the image, we use four simple steps:
- Choose the Scissors Select tool (it selects according to colour and attempts to automatically identify edges),
- Left click somewhere at the edge of the model’s outline,
- Moving in a regular and constant direction (e.g clockwise or counterclockwise), continue to click at the model’s outline wherever there’s a change in pattern (e.g it changes direction or becomes jagged); do this until the complete outline has been outlined, then,
- Press enter to commit to the selection choice,
- Right-click the image and navigate Edit>Cut.
The outline of the selection area may be adjusted by clicking and dragging the drawn segments until they’re as required.
Alternatively,
- Choose the Fuzzy Select tool or Select by Colour tool to highlight segments to be removed from a layer, then
- Navigate Edit>Cut.
Filling with colour
We did this earlier on but to recap, we can fill a layer or selection with colour by left-clicking the colour square and choosing a pen colour, selecting the Bucket Fill tool then left-clicking the region (or selection) to be coloured in.
Adding transparency
GIMP’s definition of transparency is synonymous with completely see-through. If you want to make something partially see-through then you need to look at Adding Opacity which is next.
- Right click anywhere on the image,
- Navigate to Colours>Colour to Alph,
- Click the colour bar shown in the pop-up dialogue (between “From” and “to alpha”),
- Select the colour to be removed (use the colour picker tool to select it directly from the image),
- Click O.K.
Not difficult but it’s a pain in the neck to figure it out without instructions.
See also: How to Make a Semi-Transparent Image Using GIMP.
Adding Opacity
This is another one that took me a while to discover and I know many others struggle with this because I get a lot of traffic to JournalXtra from people searching for instructions to make images into watermarks using GIMP. Opacity is how we make watermark images.
To make an image semi-transparent we must change its opacity, using the Layers dialogue box:
- select the layer to be made see-through,
- use the sliding bar that has opacity written next to it to vary how see-through it is.
See also: whereis gimp” or “which gimp” to locate the shared GIMP folders.
Now you know where to put the plug-ins, you need to know how to install them. Plug-ins come in 4 different formats:
- Script-Fu which end in .scm,
- Python (or Python-Fu) which end in .py,
- Pearl which end in .pl, and
- C, C++ which end in .c .
Each type is installed slightly differently:
- download your chosen plug-in or script from http://registry.gimp.org/ (or another reputable source);
- most scripts and plug-ins are stored in compressed formats such as .tar.gz or .zip; if it is, uncompress it and enter its folder;
- when the uncompressed file type is an .scm then copy it or move it to your scripts folder,
- when the uncompressed file type is a .py or .pl then copy it or move it to your plug-ins folder. Linux and Unix users need to make these files executable by either opening a terminal in the plug-ins folder and typing chmod +x filename.py or chmod +x filename.pl (replace “filename” with the name of the file). Alternatively (in Ubuntu), right-click the file, select Properties, choose the Permissions tab then tick “Is Executable”; users of other operating systems might need to do similar to make the file executable;
- when the uncompressed file type is a .c then open a terminal (command line) in its folder and type gimptools-2.0 –build file.c (replace “file” with the file’s name) to compile it. A new “executable” file will be created. It will have the same name as the .c file but will not have the .c ending. Copy it or move it to GIMP’s scripts folder.
If GIMP is running when you install the new plug-ins, restart it to get it to register them.
I’ve put all the plugins and scripts that I use into a zip file which you can download by clicking here. Virus check it before using it, specially so if you’re a Windows user. To use it, uncompress it and place the files into GIMP’s plug-ins or scripts folder (personally, I put them all into both).
Of the scripts I use, the most useful ones are,
G’MIC which is an interface that contains a full collection of very useful image effects. Chosen effects are updated live in a preview window unlike most plugins which have to be run before the effect is visible. G’MIC is accessed via the Filters menu. G’MIC can be downloaded from here;
MathMap is both a GIMP plugin and a command line utility that provides over one hundred image manipulation processes and filters. In every day terms that means it creates animations and adds effects to images. It can be downloaded here (and, the bleeding-edge GiT version, here) and requires a few extra items to be installed on the host computer (GSL, fftw3, libgtksourceview, libjpeg, libpng, libgif (preferred) or libungif, gettext, libnoise and libtools (plus, if you’re building from GiT, clisp, bison and flex)). There are also click-n-install binary packages available for both Windows and Linux for those who prefer the ready made ones. If you want to install it by building it from the sourcecode do so by opening a terminal window in the MathMap directory and type “sudo make”, let it do its stuff then type “sudo make install”. Once installed it will be found in Filters>Generic>MathMap. Additional plugins for this plugin are available from DeviantArt;
Shape Paths which makes it possible to create various ellipses, polygons, sine waves and other odd shapes. It’s accessed through Script-Fu>Shape Paths;
Website Window which creates background graphics for html pages, images and other web elements. It’s accessed though File>Website Window;
Gimp-to-CSS which converts the visible layer to an HTML page. It’s accessed though the top bar under “gimp-to-css”;
Watermark which creates and positions a watermark over an image or layer. It’s accessed through Script-Fu>MyScripts; and,
Colourise which re-colours black and white images. It’s accessed through Colours>Colourise. To use it, turn the image’s colour mode to RGB via Image>Mode>RGB then create a new layer. Scrawl a few lines of colour on to the new layer then select the black and white image’s layer before navigating to Colours>Colourise then adjusting the settings in the application’s panel window.
There are so many plug-ins available and I use so many that it would take me a few days to list them all.
A Short Summary
GIMP is an image editor not an artists creation tool but adding plug-ins turns it into a very useful graphics creation and image editing tool. I said it was a short summary ;-)



 Logo Title (whatever text the logo displays),