So you’ve been messing around with your hard drive partitions and your partition numbers are listed in the wrong order and now you want to know how to fix them so they run sequentially from lowest to highest.
I bet you’ve already tried “update-grub”. If you haven’t, don’t. It will make about as much difference to the partition names as driving an Aston Martin into the sea will help you travel to a tropical island.
If you haven’t a clue what I’m talking about then you probably don’t need to read this but here’s a quick textual example of ordered storage device partition naming to help you understand:
sda1 | sda5 | sda6 | sda7
And here’s an example of unordered storage device partition naming:
sda1 | sda7 | sda5 | sda6
It is very easy to fix partition name ordering with that most feared and deadly disk management tool called fdisk.
Warning: fixing, moving or altering disk partitions can result in data loss. Fdisk and other disk management tools have completely buggered many storage devices when used to correct drive faults. Although you are about to learn something that is usually safe, I must warn you to be cautious and back up irreplaceable data first. You should consider using testdisk if a mistake is made and data is lost.
Using fdisk to Reorder Drive Partition Labels
Firstly, we need to learn the logical name of the disk that houses the unordered partitions name. If you don’t already know which drive’s partition naming is an unordered mess then you probably don’t have anything to fix. But for informational purposes…
Open a terminal and type
sudo fdisk -l
That’s a lowercase “L”.
This will list storage devices in alphanumeric order. Look through the data reported and note the name of any devices that are listed out of numerical order.
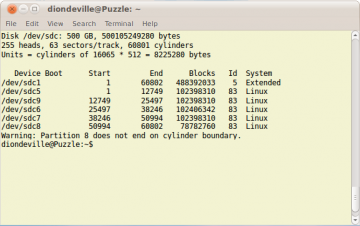
For example, look at Image One

Image one shows a 500 GB disk with 6 partitions on it. They are listed as
- /dev/sdc1
- /dev/sdc5
- /dev/sdc9
- /dev/sdc6
- /dev/sdc7
- /dev/sdc8
The 500 GB device is named sdc and its individual partitions are represented by a number. Your own device might be called sda or sdb or hdd. There is more about Linux storage device names a little later.
Notice that there is a warning message for partition 8.
Do not worry about the error message “Warning: Partition #x does not end on cylinder boundary.” unless its end block comes after the next listed partition’s start block.
Notice that partition sdc9 is listed between sdc5 and sdc6!
To reorder the Linux drive partition numbers for device sdc, all we need to do is open a terminal…
- type
sudo fdisk /dev/sdc
- then
- press “x” to enter Expert Mode
- press “f” to fix the drive order
- press “i” to ignore the warning (if it shows)
- press “w” to write changes to the disk
- press “q” to quit fdisk
It’s that simple.
Replace /dev/sdc with the name of the device you wish to reorganize partition numbers on.
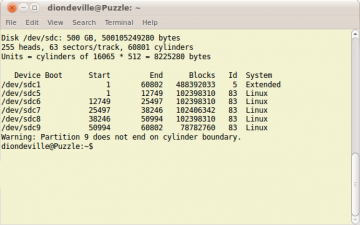
Now check the drive partition naming order by typing sudo fdisk -l into a terminal.
Image Two shows the new partition name ordering for /dev/sdc.

Notice that the cylinder boundary warning message is now for device sda9. The partitions have not been moved, only the devices have been renamed so /dev/sda9 is the new name for what was known as /dev/sda8.
A little More About Linux Storage Device Naming Conventions
Linux names storage devices after their adapter type and registration order:
- SCSI device names are prefixed “sd”
- IDE device names are prefixed “hd”
But not always!
Newer Linux distributions such as Ubuntu Maverick prefix both SCSI and IDE devices “sd”.
The registration order is indicated by a letter of the alphabet. For example,
- sda is storage device a
- sdb is storage device b
- sdc is storage device c
The actual registration order is determined by magic!
Seriously, as far as I can deduce, registration order is sometimes determined by the BIOS/Motherboard, sometimes it is determined by chance and at other times it is determined by the order in which devices are connected to the computer post the operating system’s installation. There is a set order but I do not know what it is. Please comment if you have better information about this.
Each storage device may be split into either 4 primary partitions or a combination of primary and extended partitions up to a maximum count of 4 total partitions.
Extended partitions may be further subdivided into logical partitions. For example
- sda1 is storage device a, primary partition 1
- sdb1 is storage device b, extended partition 1
- sdb5 is storage device b, logical partition 5
- sdb6 is storage device b, logical partition 6
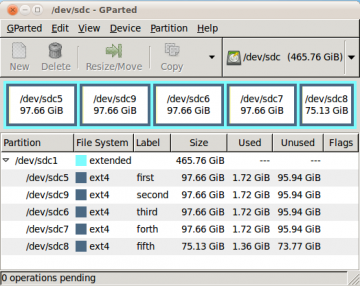
Partition numbers 1 to 4 are reserved for primary and extended partitions. Logical partitions are numbered from 5 onwards. In Image Three, partitions 5,6,7,8 and 9 are logical partitions in extended partition 1 of disk drive sdc.

Storage devices are listed in the file system as device files under /dev so they are referred to as, for example,
- /dev/sda
- /dev/sdb
- /dev/sdc
There are three ways to discover the logical name of a storage device:
- graphical
- textual
- ask someone else to work it out
The graphical method is easiest for most people. If you want to try it, install a program such as GParted. GParted is used in the images displayed above.
There are many textual methods we can use to learn information about storage devices attached to a computer. Earlier, we used fdisk -l but typing any of the following instructions into a terminal will also give various amounts of information about the storage devices attached to a computer:
- sudo fdisk -l
- sudo lshw -class disks
- sudo df
- sudo mount
- sudo dmesg | grep ‘[s|h]d[a-z]’
- sudo ls /dev | grep ‘[s|h]d[a-z]’
The last five of those methods have drawbacks, or benefits, depending on how you look at them:
- df and mount require disks to be mounted before they will display information about them.
- lshw and dmesg display the name, capacity and other information about all disks whether mounted or not but neither displays partition information.
- ls will list names of all attached disks including their partitions whether they are mounted or not but it does not show any other information.
As a final note, if you want to mount all storage devices open a terminal and type
- sudo mount -a
If you want to unmount all inactive storage devices, type
- sudo umount -a
If you have any advice or feel the need to correct anything written here then please leave a comment :-)
